
There are so many things I love about our house (our somewhat simple laundry room renovation still makes me smile), and there are a few things on my home improvement list that we are slowly completing that make me love my house even more. Recently my husband wanted to try gel stain on a piece of furniture he found at Goodwill…so that naturally led to me telling him what a fun project staining banisters with gel stain would be. The internet says you don’t need to sand first when you use gel stain, which is a huge time saving tip. OK, so maybe staining banisters and fun aren’t words that go hand in hand, but the results speak for themselves and this is a simple home update that won’t break the bank.

![]()
Please note: This is not a sponsored post. We purchased all the products mentioned with our own money. This post does contain amazon affiliate links.
I am just not a fan of orange oak. Like at all. In our old house we used Rustoleum Cabinet Transformation to get rid of the orange cabinets in the bathrooms. In our new house we have white cabinets so the orange oak is not a problem there. It only rears its ugly head on the banisters…and the floor too (but the floor is staying that way).

We attempted to get gel stain at both Lowes and Home Depot. Neither of these stores carried gel stain (nor do they advertise having it on either of their websites, so we weren’t shocked or upset, ). The best banister staining tutorials (including this one) say to use General Finishes. So we used the General Finishes store locator and went to a local woodworking store. Or….as my husband called it….”Michaels for men.” Ha!

We purchased quart of General Finishes Gel Stain in Java (also available here on Amazon). I counted down the minutes until we put the girls to bed and once they were tucked in my husband started gel staining with a piece of an old shirt. It didn’t take long to realize that gel stain is messy.
The Truth about Gel Stain
Gloves are an absolute requirement. Mandatory. Consider getting a 100 count box of gloves.
It’s messy. The easiest way to apply gel stain is with an old rag or t-shirt. You will be constantly folding your cloth which means both of your hands will have stain all over them.
Gel stain is unforgiving. With paint you can get a little on another piece of wood and quickly wipe it off. That is not the case with gel stain. I already mentioned that it is messy. Messy and unforgiving is not a great combination.
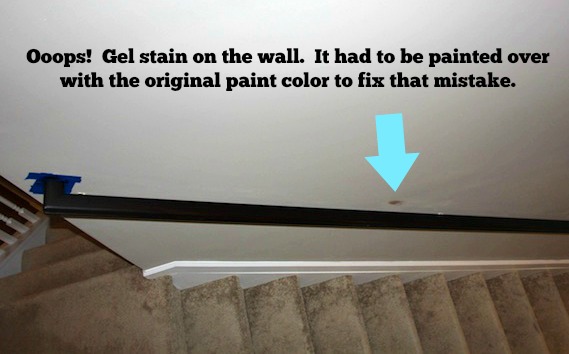 Taping is a must. Being messy and unforgiving means that you need to tape like a crazy person. Having your paint colors on hand is another great idea.
It really does take a long time to dry. Our first coat took 10-12 hours to completely dry and become non-tacky.
Gel Stain requires at least (AT LEAST) two coats.

Gel Staining Banisters – After the first coat of gel stain had dried.
My husband is an absolute rock star and he knocked out most of our banister the first night. I thought I would finish after he went to bed. it should be known that I am a very messy painter with regular paint. It is one of those things that has driven my husband to do all the painting in our house. He is neat and precise. I drip paint. Sooooo, he went to bed and I started gel staining and I quickly learned it is not my thing. I am waaaaaaaaay to messy. I dripped a drop on the floor (thank goodness for WD-40). I started sweating and swearing (not a great combination) as I made my mess….and then I stopped. My husband is better than me, so I saved the pain of having to fix all my touch ups. I was actually thanked for this!
Because a picture speaks a thousand words here are some before and afters of our banisters.
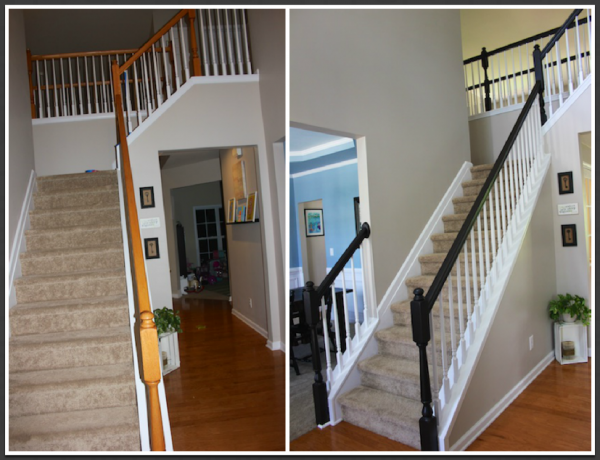
The entry way is absolutely amazing! The contrast with the wall color and carpet makes the java color pop even more.
We did not sand or strip the wood at all before starting.

Don’t get me started on upstairs. The length of banister is loooong up there. So this looks much more visually appealing.
We didn’t use a polyurethane/polycrylic to seal these…and it has been 8+ months since we completed this project. There are a few spots that have worn, so we will fix those and then add a coat of poly to make it last even longer!
So, is this a project you think you will try at your house?
![]()

Don’t miss the latest and greatest from Coupons Are Great. Sign up for our Weekly Email.
 Leandrea is a married mom of two girls, ages 13 and 12, living in Atlanta, GA. She is passionate about helping people save money one coupon at a time. Read more
So the pros definitely outweigh the cons with this then? I guess as long as you’re careful with it it’s a huge time saver if you don’t need to sand – I’m guessing that means it’s pretty thick if it’s able to hide the imperfections in the wood.